
Step by Step guide about how to collect EV Code Signing Certificate after validation?
It is a brave new world with millions of users downloading and installing mobile applications each day. But unfortunately, these apps can be a cybersecurity nightmare without an EV code signing certificate.
Take an example of Capital One. The US banking giant used hosted AWS system to power its customer-facing applications. In 2019, they faced a server-side request forgery(SSRF) attack. It compromised millions of user data.
You can avoid such attacks by using an EV code signing certificate from a trustworthy certificate authority like Comodo. EV stands for extended validation, where a CA vets the requestor organization’s identity, location, business legitimacy, etc.
Further after the vetting process, a code signing certificate is issued for an application. It allows users to authenticate the identity of the publisher before downloading it. Here is a guide for collecting your EV Code Signing Certificate for enhanced security.
Let us begin with a basic understanding of the EV code signing certificate.
What is EV Code Signing Certificates?
An EV code signing certificate is perfect for enterprises looking to secure experience for their customer-facing apps. It offers enhanced security and a higher level of authentication. Increased trust in applications means higher downloads.
An EV code signing certificate has extended validation that involves a two-factor authentication of the publisher’s identity. The code signing needs private keys stored on physical storage. So, it provides an extended vetting of the software or app publisher before issuing the certificate.
Most of the CAs provides EV code signing certificate with support for Windows SmartScreen. Microsoft Defender SmartScreen or Windows SmartScreen protects the Edge browser from phishing websites and filters malicious websites.
So, if there is no support for the Windows SmartScreen, your users will face a warning. This is where an EV code signing certificate can help. Now that we have an idea about the EV code signed certificates let us understand how to collect one for your organization.
Here is what you get in the package,
- Hardware security module-based card- You will get a card with a chip that has a private key stored in it. The device or card is as per the HSM standards.
- Reader for the HSM card-It is a device that reads the HSM card and locks your apps with the private key.
- An acknowledgment letter is a letter from the certificate authority with all the necessary instructions and acknowledgment of the code-signed app.
Now that you know what is to expect from the EV code signing package let us understand the steps to collect it.
How to Collect EV Code Signing Certificate?
One of the critical aspects of your acknowledgment letter will lead you to the first step of collecting the Comodo EV Code Signing Certificate. So, it is recommended not to throw it away or misplace the letter.
Step #1: Download & Install SafeNet Authentication Client
The first step to download the SafeNet authentication client. It is a middleware client which manages eTokens, the smart cards issued by CA, USB, and other software-based devices. It offers complete backward compatibility and provides full support for older versions.
For you, what matters is the software without which you may not be able to access the certificate. First, go to the URL provided in the acknowledgment letter and download the executable file. After downloading the software, install it and restart your computer.
Step #2: Plug in your Smart Card
Plugin your smart card device provided in the package. The smart card must be inserted into the reader. Once you plug in the device, you will observe some blinking lights on the device, indicating it is ready for use. Your computer will install the required drivers for the device; you will see the card detected by SafeNet software.
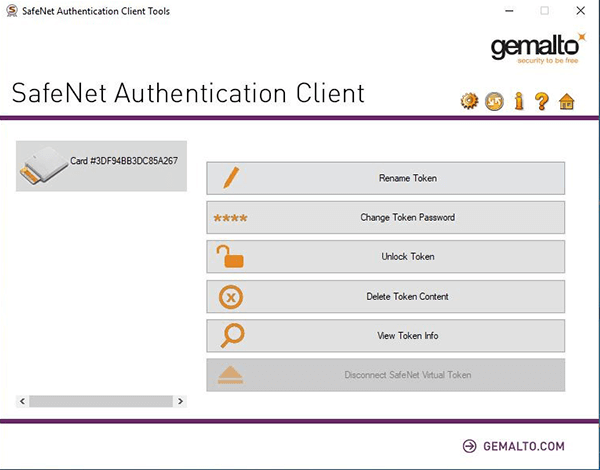
Step #3: Change your token password.
The next step is to change the token password. It is a step that can help you improve your security as you can set a private password.
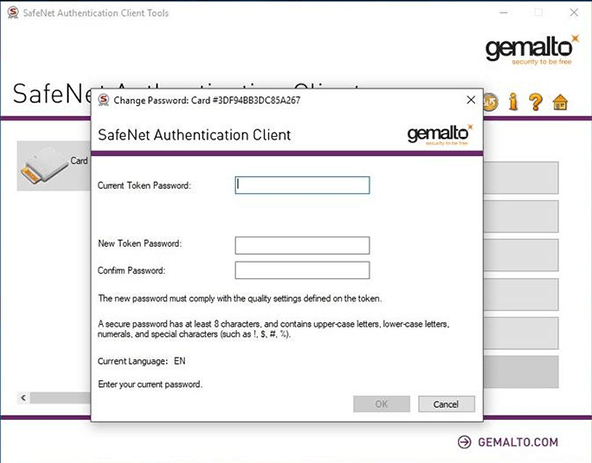
Simply choose the option to change the token password. For this step, you will need the password provided by Comodo in the email.
Step #4: Collect your certificates.
Once you change the token password, it is time to collect your certificate. There is a gear icon on the top of the window, which will allow you to open the option on the sidebar panel. It will have multiple dropdowns, which you need to click until you reach the Comodo EV code signing certificate.
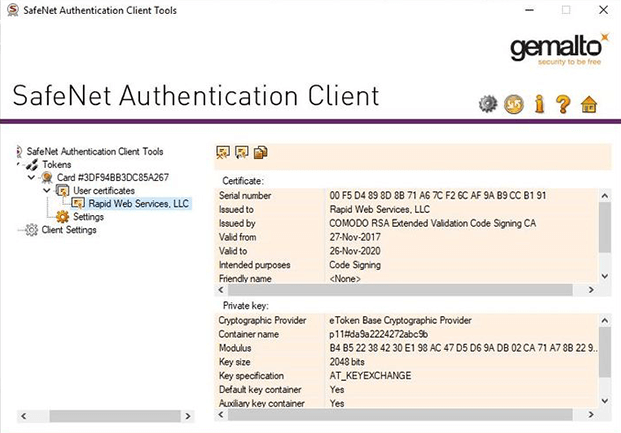
That is, you have collected the certificate. Now is the time to code-sign your applications. Here you will again need the SafeNet client.
Code-signing process
The code signing process begins by plugging the USB device into your computer with the private key. Next, you need to open the SafeNet client and the command prompt. Next, you need to enter the following code,
/tr https://timestamp.comodoca.com /td sha256 /fd sha256 /a “Insert_path_to_the_file_you_wish_to_sign ”
On entering the code, you will be prompted to enter the password which already changed once you do that, your application will be code-signed.
Conclusion
Now that you have code-signed your application with an EV code signing certificate, it is time to verify it. Simply go to the application folder, right-click on the .exe file and check the properties. You will find a digital signature tab with your certificate. Verification is necessary before allowing your users to download and install the application. Once verified, your app is good to go!
Related Post: